
After reading this title, you are probably wondering what in the world is hoshigaki? Hoshigaki means dried persimmon in Japanese. In an earlier article where we advocated for planting persimmon trees in a no-spray orchard we mentioned that this was one of the uses for persimmons. Today we are going to show you how to make hoshigaki from your persimmon harvest.
Persimmons ripen all at the same time. Obviously, you can only eat so many at that time, so you must either waste or preserve the remaining persimmons. Hoshigaki is an ancient food preservation technique used by the Japanese people to preserve persimmons for use during the winter months. Additionally, while astringent persimmons are not edible straight off the tree, after being turned into hoshigaki, they morph into honey sweet treats.
By making hoshigaki, none of the persimmon harvest goes to waste. Hoshigaki can be stored for months and months. Plus, drying persimmons this way requires no refrigeration, fancy tools, or modern preservation methods.
If you are one of the people interested in reconnecting with your food. Hoshigaki most certainly meets the definition of slow food. It is relatively labor intensive, and takes a month or two to make. However, just like with vegetable gardening, it allows you time to relax, reflect, and appreciate your food in a way that is often missing in fast food culture. Your months of patience will be pay off with the satisfaction of creating a healthy, delicious treat unlike any other dried fruit you have ever tried.
Making hoshigaki is simple. You will need persimmons, string, a peeler, pot of boiling water and a place to hang the fruit to dry. The only other thing you will need is the commitment of spending a few minutes a day massaging the persimmons.
Step 1: Select appropriate persimmons

It is critical to your success that you select appropriate persimmons for making hoshigaki. Traditionally hoshigaki was made from astringent persimmons. However, hoshigaki can be made from either astringent or non-astringent persimmons. We use Fuyu persimmons to make hoshigaki because they are what we have available, and we find non-astringent persimmons to be more versatile for other uses.
The only type of persimmons that should be avoided are seeded persimmons. So though American persimmons are astringent and plentiful in some areas they should not be used. Persimmons seeds are hard as a rock, and will ruin your hoshigaki.
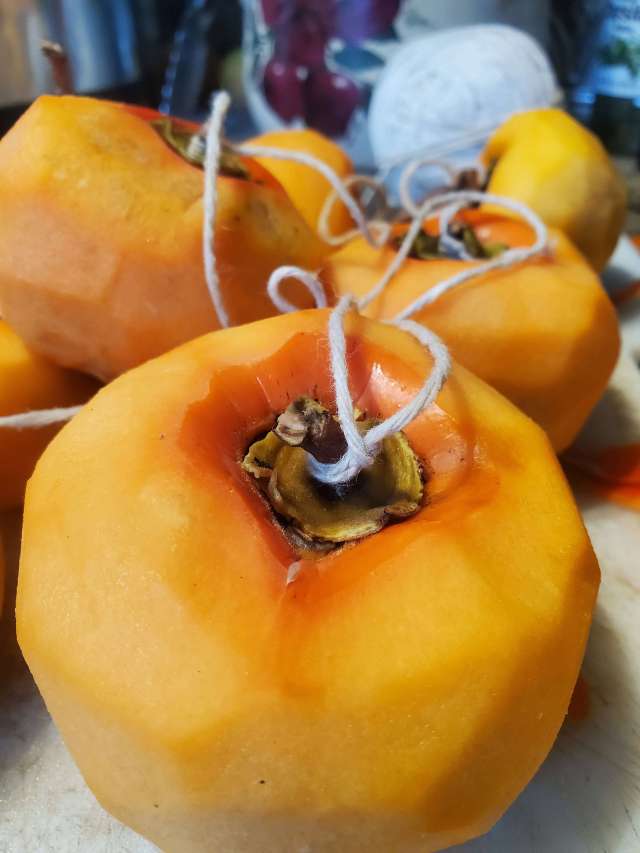
The persimmons that you use to make hoshigaki should be firm and blemish free. You will be peeling the persimmons, so they must be firm for you to be able to do that. You also should try to select persimmons that have a nice long stem. Ideally they would have a small piece of branch attached as well. That way the string you tie around them will not slip off.
If you do not have persimmons with suitable stems, you can use a skewer to pierce the persimmon just underneath the stem, or a screw jammed into the stem end. You just need to provide something to hang it from. If you do use a foreign object to puncture your persimmon, make sure that you sterilize the object with boiling water prior to stabbing it through the persimmon. If you do not, you may disappointingly end up with a persimmon full of mold rather than hoshigaki.
You also want to make sure your persimmons are blemish free and not bruised. Damaged persimmons will be prone to rotting. Starting with the persimmons least likely to rot will make you more successful at slowly drying them.
Step 2: Prepare the persimmons

Once you have selected which persimmons you will be using for hoshigaki, you need to thoroughly wash and then peel the persimmons. As you are washing, or before you peel the persimmons, you can break off the loose leafy portions near the stem end leaving just the firmly attached portion in the center. Remove all of the skin, you can but do NOT remove the stem end of the persimmon. Removing the skin is what will allow the fruit to slowly dehydrate.
Once you have a bunch of persimmons peeled, you need to tie a string onto each stem. Tie the string tightly. You do not want the persimmon to fall off as you are manipulating them or if they get bumped.
Traditionally, a persimmon was tied to each end of a short string and then they were hung over a bamboo rod. You can also tie a whole bunch of them in a line down a string if that better suits the space available to you. It doesn’t really matter how you do this as long as you make sure that none of the persimmons are touching. They need to have good airflow around them.
Step 3: Scald the persimmons
When you have all of your persimmons tied on strings, it is time to sterilize them. This can be done by dipping them in an alcohol like Vodka, or by using boiling water. We have had good success using the boiling water method.
To use the boiling water method, heat a large pot of water to boiling. Once the water is boiling, dip your strings of persimmons in the water and immediately pull them back out. Allow them to drip dry for a minute and then hang them up where they are not touching anything. You do not want to recontaminate them by setting them on a non-sterile surface after they come out of the boiling water.
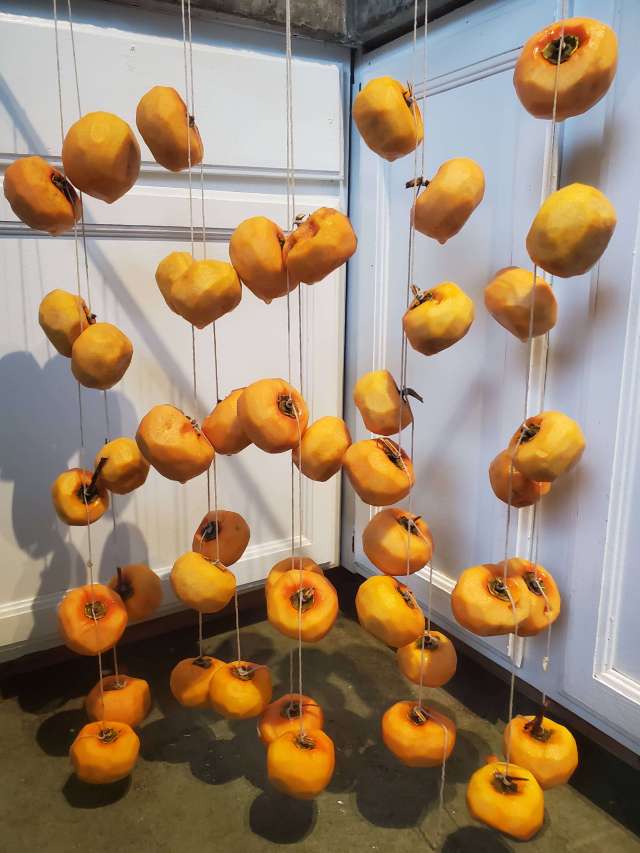
Step 4: Hang the hoshigaki to dry
After scalding, you will need to hang your hoshigaki in a location that provides good drying conditions. This needs to be a clean place that they can hang for a month or more as they slowly dry. It can be either indoors or outdoors, and a sunny location is best. However, the only absolutely necessary criteria is that is is a warm, dry location. Do not put them in a very humid location or a cold damp basement as that will cause them to rot and mold rather than drying.
If you have selected a good location for your hoshigaki, they will form a dry, kind of leathery skin and shrivel considerably in the first week of hanging. If your hoshigaki has not done this you need to move them to a better spot.

Step 5: Massage your drying hoshigaki
Once your hoshigaki has formed a leathery skin, it is time to start massaging the persimmons. This must be done very gently at first. Do not squeeze them hard enough to burst through the dry exterior. As they continue to dry you can massage them more forcefully. Gently massage each persimmon briefly every day until the persimmons have fully shriveled and are fairly firm. The massaging process helps to break down the interior of the persimmon releasing the sugars and turning it into the unique hoshigaki texture.
The amount of time that it takes to transform a persimmon into hoshigaki can vary depending on how drying the environment is. It will likely take 4-6 weeks, maybe longer. You will know they are completely dried when they fail to continue to shrink.
As the hoshigaki age, they should produce a highly prized, white sugar bloom on the surface. This bloom is also an indication that your hoshigaki is nearing completion. However, if you are using a non-astringent persimmon to make hoshigaki and a bloom does not appear, do not despair. With or without the bloom the dried fruit will be delicious. We think that astringent persimmons are more likely to produce a sugar bloom than non-astringent varieties.
Once they are dried they can be left to hang or can be taken down and stored. If thoroughly dried, they can be stored at room temperature. However, they will last the longest in the refrigerator or freezer.

How to use my hoshigaki
You can start to use the hoshigaki before they are completely dry if you wish. Do some taste testing to determine what texture you prefer. Earlier in the drying process they will have a texture similar to a prune. As they get drier they will become less sticky and more chewy in texture.
Hoshigaki can be used like you would any other dried fruits. They are delightfully sweet and fruity flavored, almost like eating a chewy candy. They can be eaten alone as a snack. You can chop them up and put them in granola, use them in ice cream or in baking. Try substituting hoshigaki chunks for raisins in salads and other dishes. Because hoshigaki is so sweet, they pair well with strong or bitter flavors. Add thin slices of them to a cheese plate for your next gathering. Or try pairing them with goat cheese, pear and onion on a pizza.
We hope this has inspired you pick all those extra persimmons to try your hand at this ancient food preservation technique!
If you would like to read more articles about growing and preserving food, please sign up for our newsletter!
Please remember
The information provided is for general informational purposes only. All information on the site is provided in good faith, for general informational and educational purposes only and is not a substitute for professional advice. We make no representation or warranty of any kind, express or implied, regarding the accuracy, adequacy, validity, reliability, availability, or completeness of any information on this Site. Accordingly, before taking any actions based upon such information, we encourage you to consult with the appropriate professionals. We do not provide any kind of professional advice. THE USE OR RELIANCE OF ANY INFORMATION CONTAINED ON THE SITE IS SOLELY AT YOUR OWN RISK. View full disclaimer here.


